
Everything you need to build, publish and analyse a personality test, product chooser or voting advice application with Matchoice. New here? Start with Getting started.
The admin screens of Matchoice are in Dutch. Below, every button and menu item is named as it appears on screen, followed by its meaning in English.
Installation
Requirements: WordPress 6.5 or later and PHP 8.1 or later. Matchoice works with any theme: block themes use the blocks, classic themes the shortcodes.
- Download the zip from the download page.
- Go to Plugins › Add New › Upload Plugin, choose the zip, click Install Now and then Activate.
- A new menu item Campagnes (Campaigns) appears. Everything is there: campaigns, outcomes, results, analytics and settings.
Updating works the same way: upload the new zip and choose Replace current with uploaded. Your campaigns, answers and settings are kept.
Getting started
The quickest way to get to know Matchoice is the example test that comes with the plugin.
- Open Campagnes (Campaigns). As long as there is no campaign yet, a welcome notice shows the button Voorbeeldtest installeren (install example test). The same button is always available under Campagnes › Instellingen › Voorbeeldcontent (Campaigns › Settings › Example content).
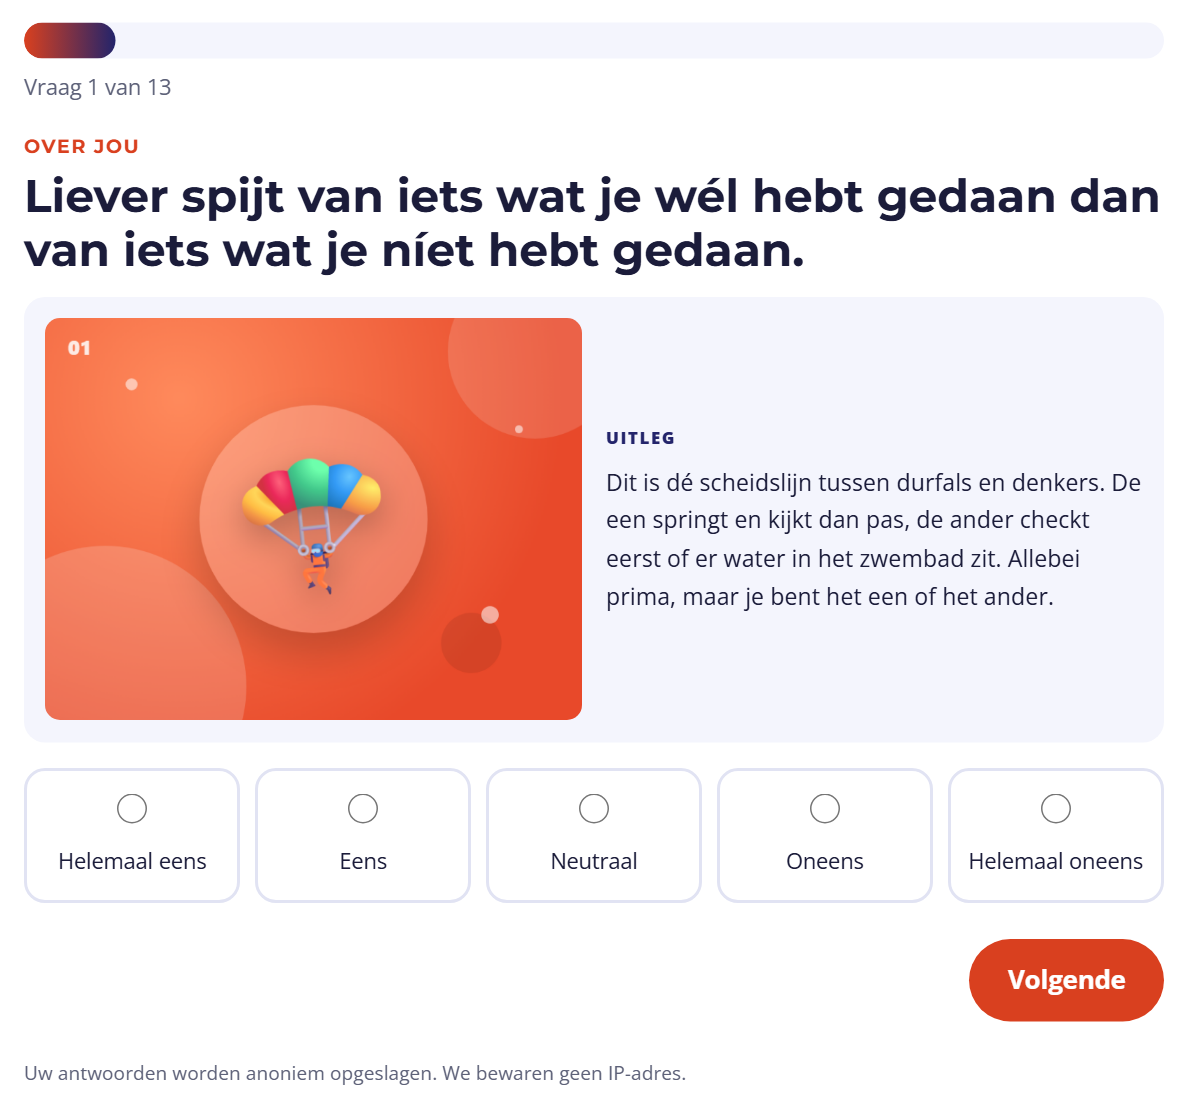
- The test “Who are you, really?” is created: ten statements with explanations and illustrations, one choice question, optional questions about age and postcode, and four outcomes with their own picture (The Daredevil, The Control Freak, The People Person, The Fact-Checker).
- Click View to take the test. While you are logged in as an administrator, your answers count as a test submission.
- Change whatever you like, or use the example as a template for your own test.

Starting from scratch? That takes four steps: create outcomes, create a campaign with questions, weigh the answers and put it on a page.
Outcomes
An outcome is what a participant ends up with: a personality type, a product, a model or a political party. Create them under Campagnes › Uitkomsten (Campaigns › Outcomes).
- Title and excerpt: the excerpt is shown with the result.
- Content: the full description on the outcome’s own page.
- Featured image: shown with the result and on the outcome’s page.
- Colour: used in bars, charts and the map.
- English: title, excerpt and content can also be entered in English.
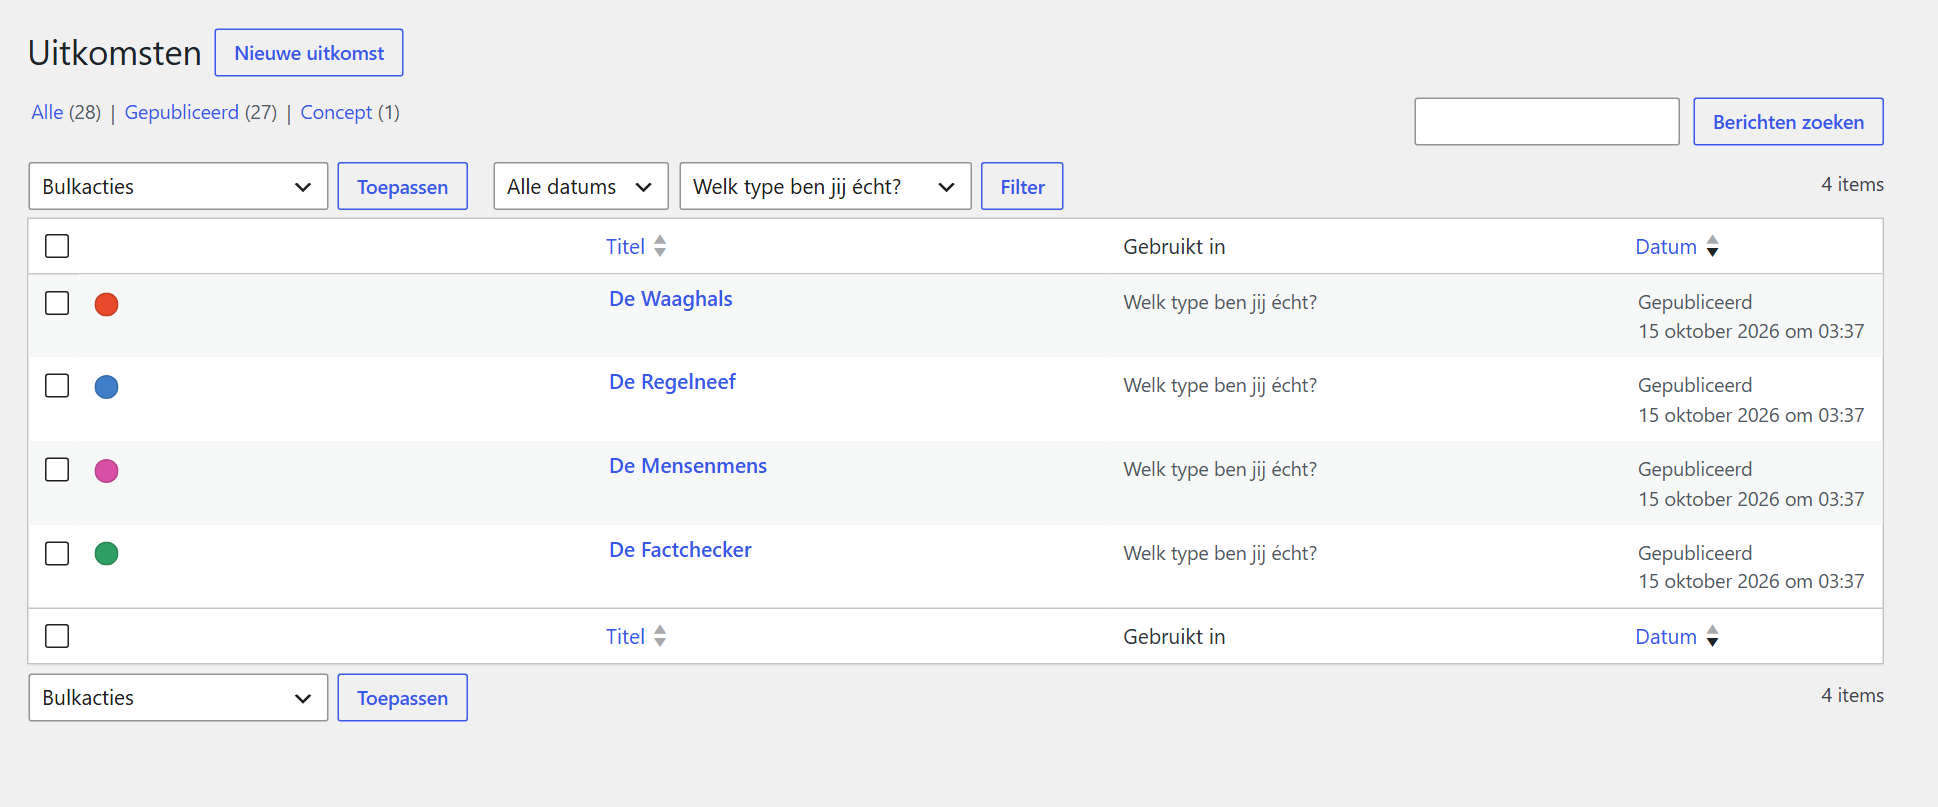
An outcome can be used in several campaigns. Every outcome has its own page; the Uitkomsten (outcomes) block shows an overview per campaign.
Creating a campaign
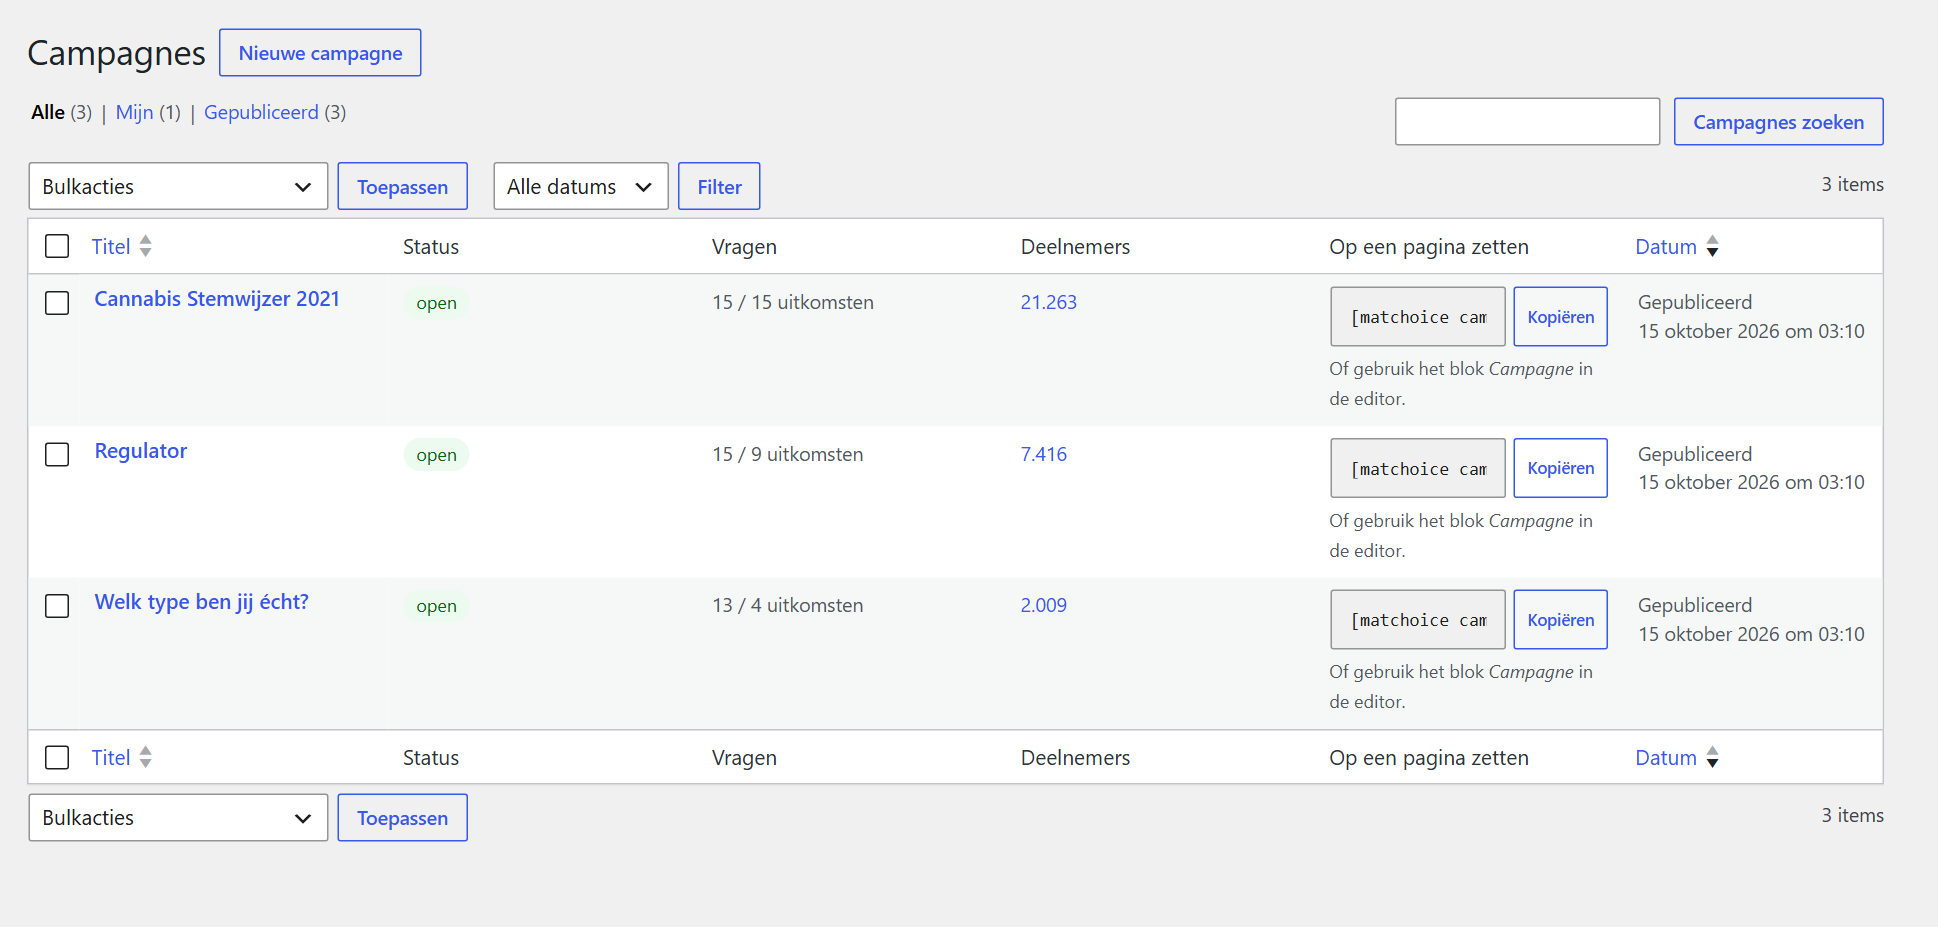
A campaign is one test with its own questions, outcomes, texts and results. Create as many as you like: Campagnes › Nieuwe campagne (Campaigns › New campaign).
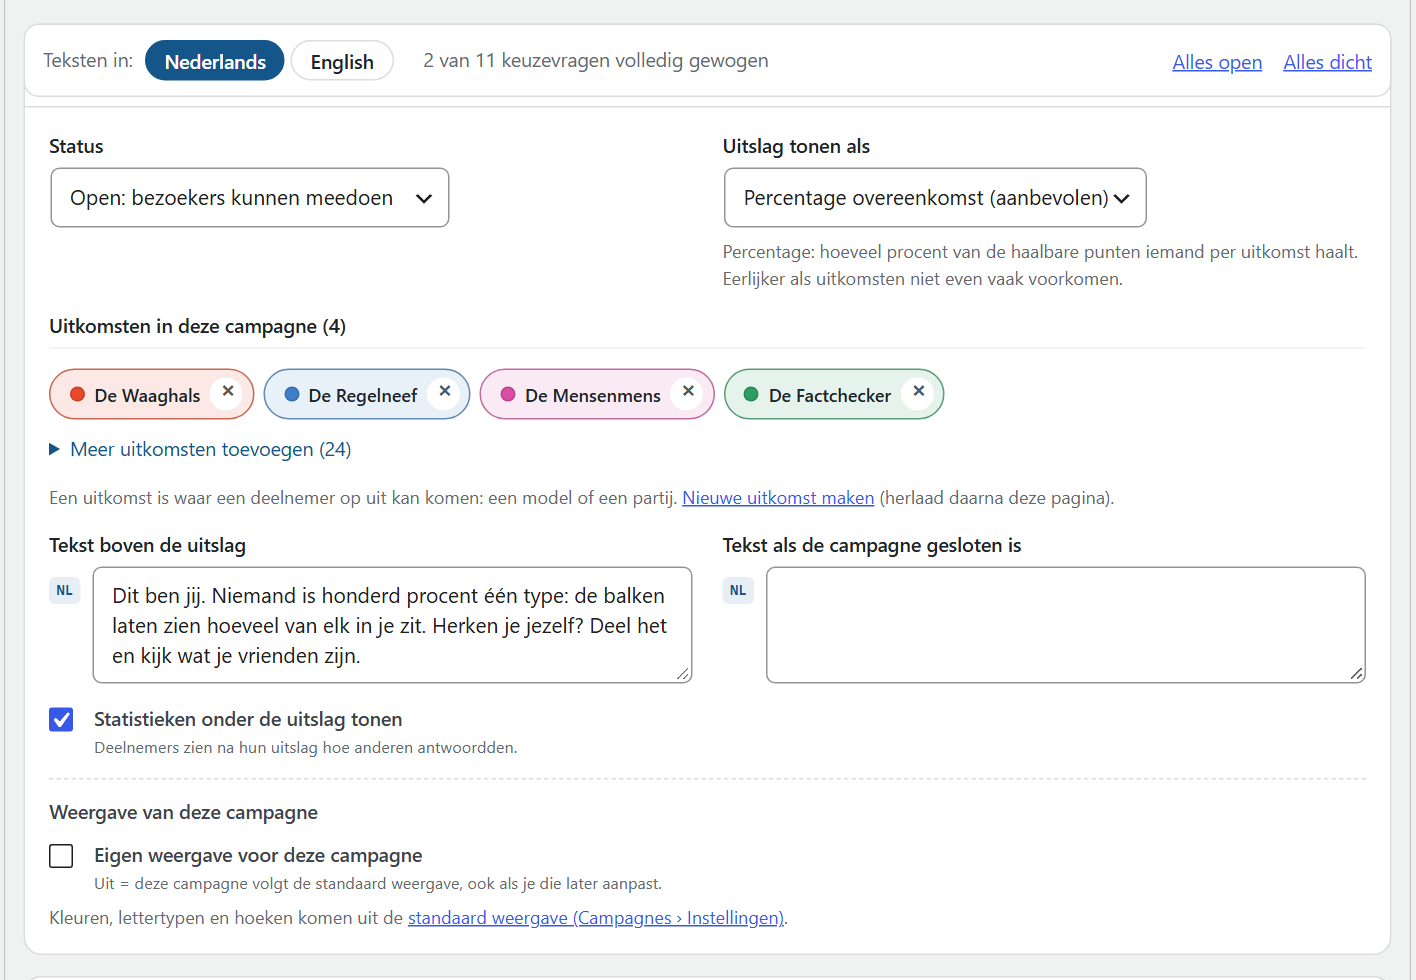
1. Campaign settings (Campagne-instellingen)
- Status: open (people can take part) or closed (archive; the “closed” text is shown).
- Outcomes: tick the outcomes that take part in this test.
- Result: in points or as a percentage of agreement (see Weighting and results).
- Text above the result and text for a closed campaign, in Dutch and English.
- Statistics below the result: participants see how others answered after their result.
- Look: colours, fonts and corners (see Look).
2. Questions
Click Vraag toevoegen (add question) and choose a question type. For every question you set:
- The question and optionally a help text below it.
- A heading (section): questions with the same heading belong together, for example “About you”.
- An explanation: a collapsible note, optionally always open.
- An image from the media library, shown next to the explanation.
- Required or optional.
- A key: a fixed name such as
leeftijd(age) orpostcode. Questions with the same key can be compared across campaigns. The question library has standard questions with a key. - Online/offline: an offline question keeps its answers but is no longer asked.
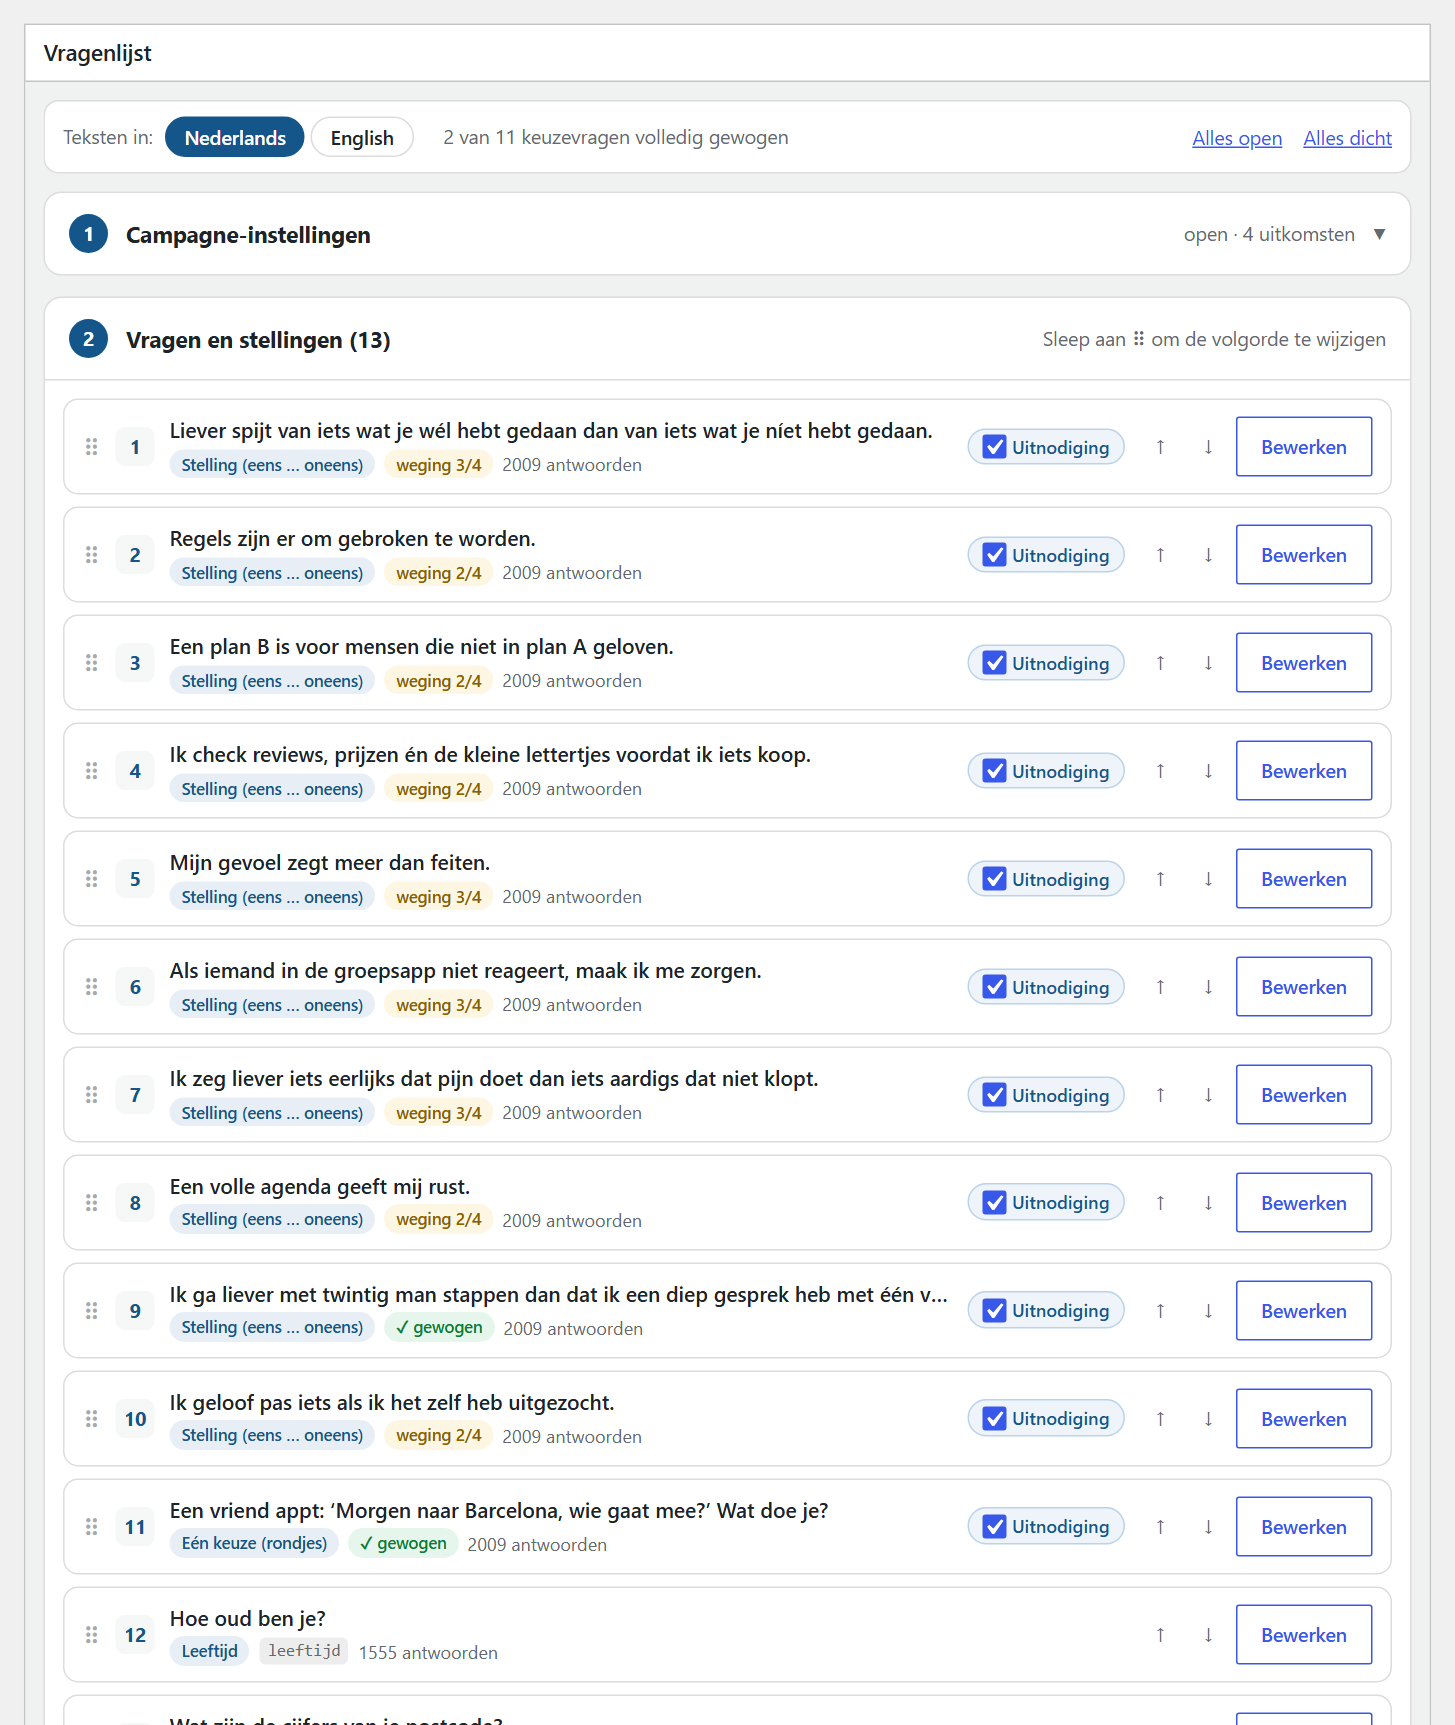
Reorder questions with the arrows or by dragging the handle. For a question that already has answers, switching it offline is better than deleting it.
3. Publishing
Click Publish. The test is then available at its own address (/test/<name>/) and can be placed on any page. As an administrator you can try a campaign before it is published; those submissions count as tests.
Question types
| Type | Use | Counts for the result |
|---|---|---|
| Single choice | One answer from a list | yes |
| Multiple choice | Several answers at once | yes |
| Dropdown | One answer from a long list | yes |
| Yes / no | A quick choice of two | yes |
| Statement (agree … disagree) | Five answers from strongly agree to strongly disagree | yes |
| Scale / slider | A value on a scale | no |
| Number | A number within limits | no |
| Age | Age; results per age group | no |
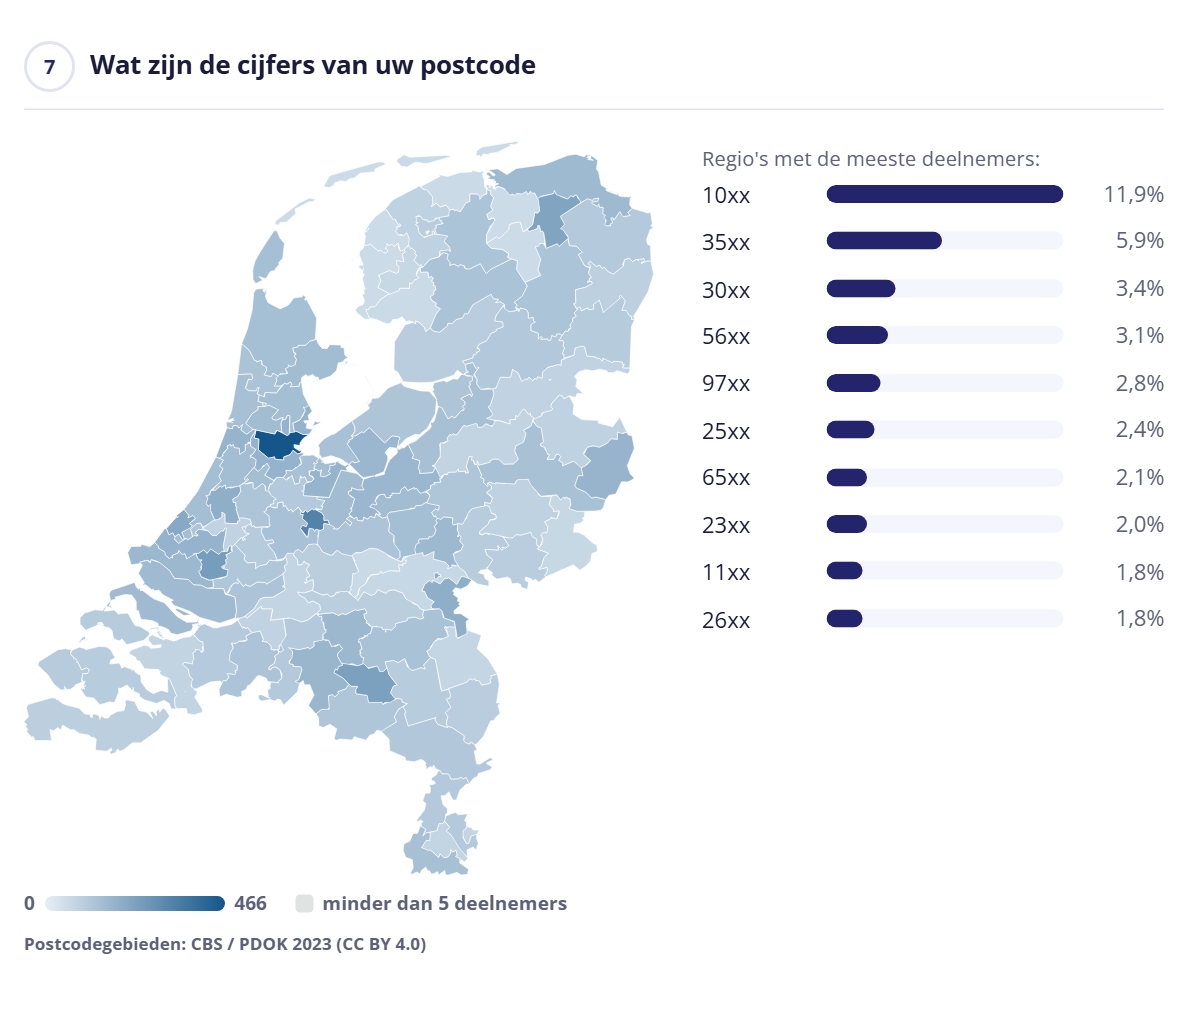
| Postcode | Digits of the postcode; results on the map | no |
| E-mail address | For example for a newsletter (personal data) | no |
| Short text / long text | Open questions (personal data) | no |
| Text block | Explanation between questions, not a question | no |
E-mail addresses and open answers are personal data: they are only included in the export when you explicitly ask for it.
Weighting and results
For questions that count, give every answer points per outcome, from −9 to +9. Open a question and use the − and + buttons per outcome, or switch to the table view for all answers and outcomes at once. The label ✓ gewogen (weighted) shows that every outcome can score on that question.
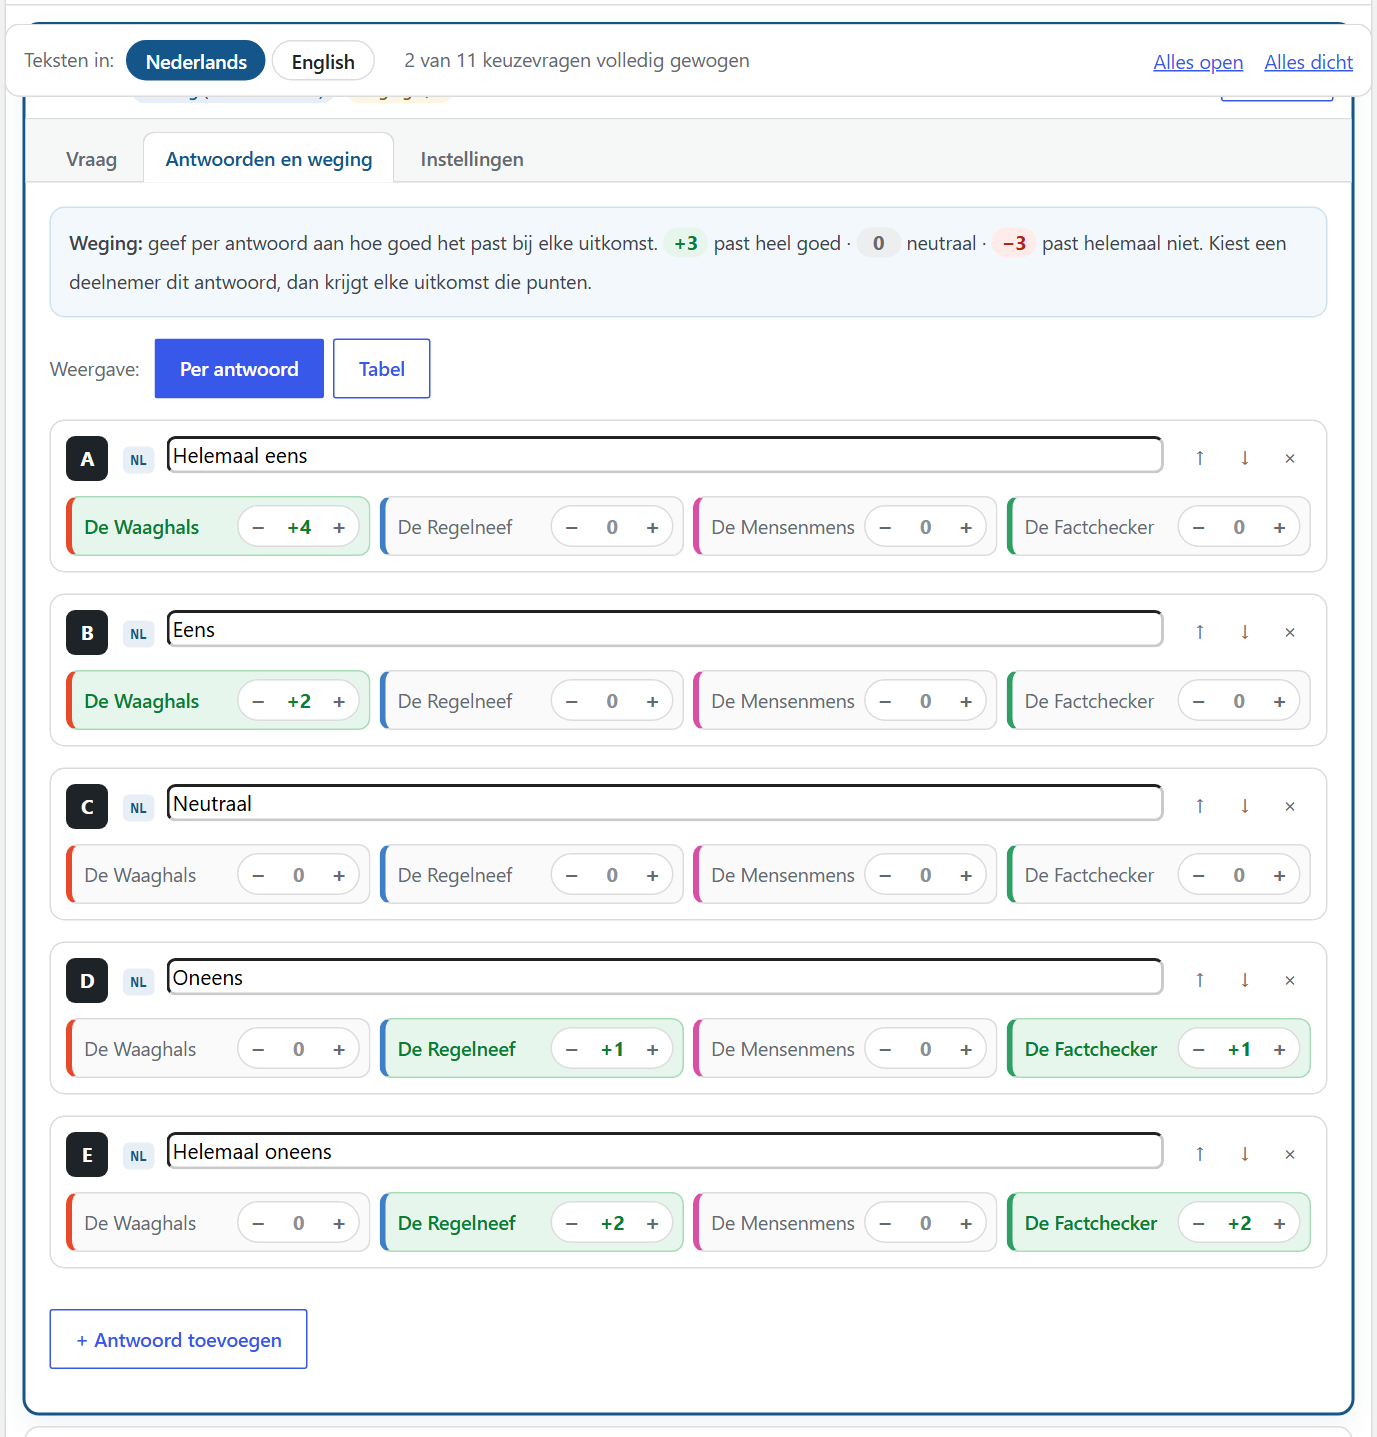
An example. For the statement “I’d rather jump first and look later” you give The Daredevil +2 for “strongly agree” and +1 for “agree”, and The Control Freak +2 for “strongly disagree”.
Points or percentage?
- Points: the outcome with the most points wins. Simple and easy to explain, but an outcome that can score on many questions has an advantage.
- % agreement: each outcome’s points are divided by the maximum it could have scored. Fairer when outcomes do not appear equally often. Recommended for voting advice.
Changing the weighting while the test is running? New participants get the new weighting. Recalculate earlier results with wp matchoice recalc <campaign>.
Look
By default Matchoice uses the colours and fonts of your theme. Under Campagnes › Instellingen › Standaard weergave (Campaigns › Settings › Default look) you set your own default for all campaigns:
- Main colour (headings, progress bar) and accent colour (buttons, chosen answers).
- Background colour and text colour: the test is placed on a coloured panel.
- Fonts for questions and text. Only fonts of the theme or the device; no external font services are loaded.
- Corners: rounded, square or very round.
- Thickness of the progress bar and width of the explanation image (left or right of the explanation).
- Country of the postcode question: the Netherlands (with map), Belgium or any four-digit number.
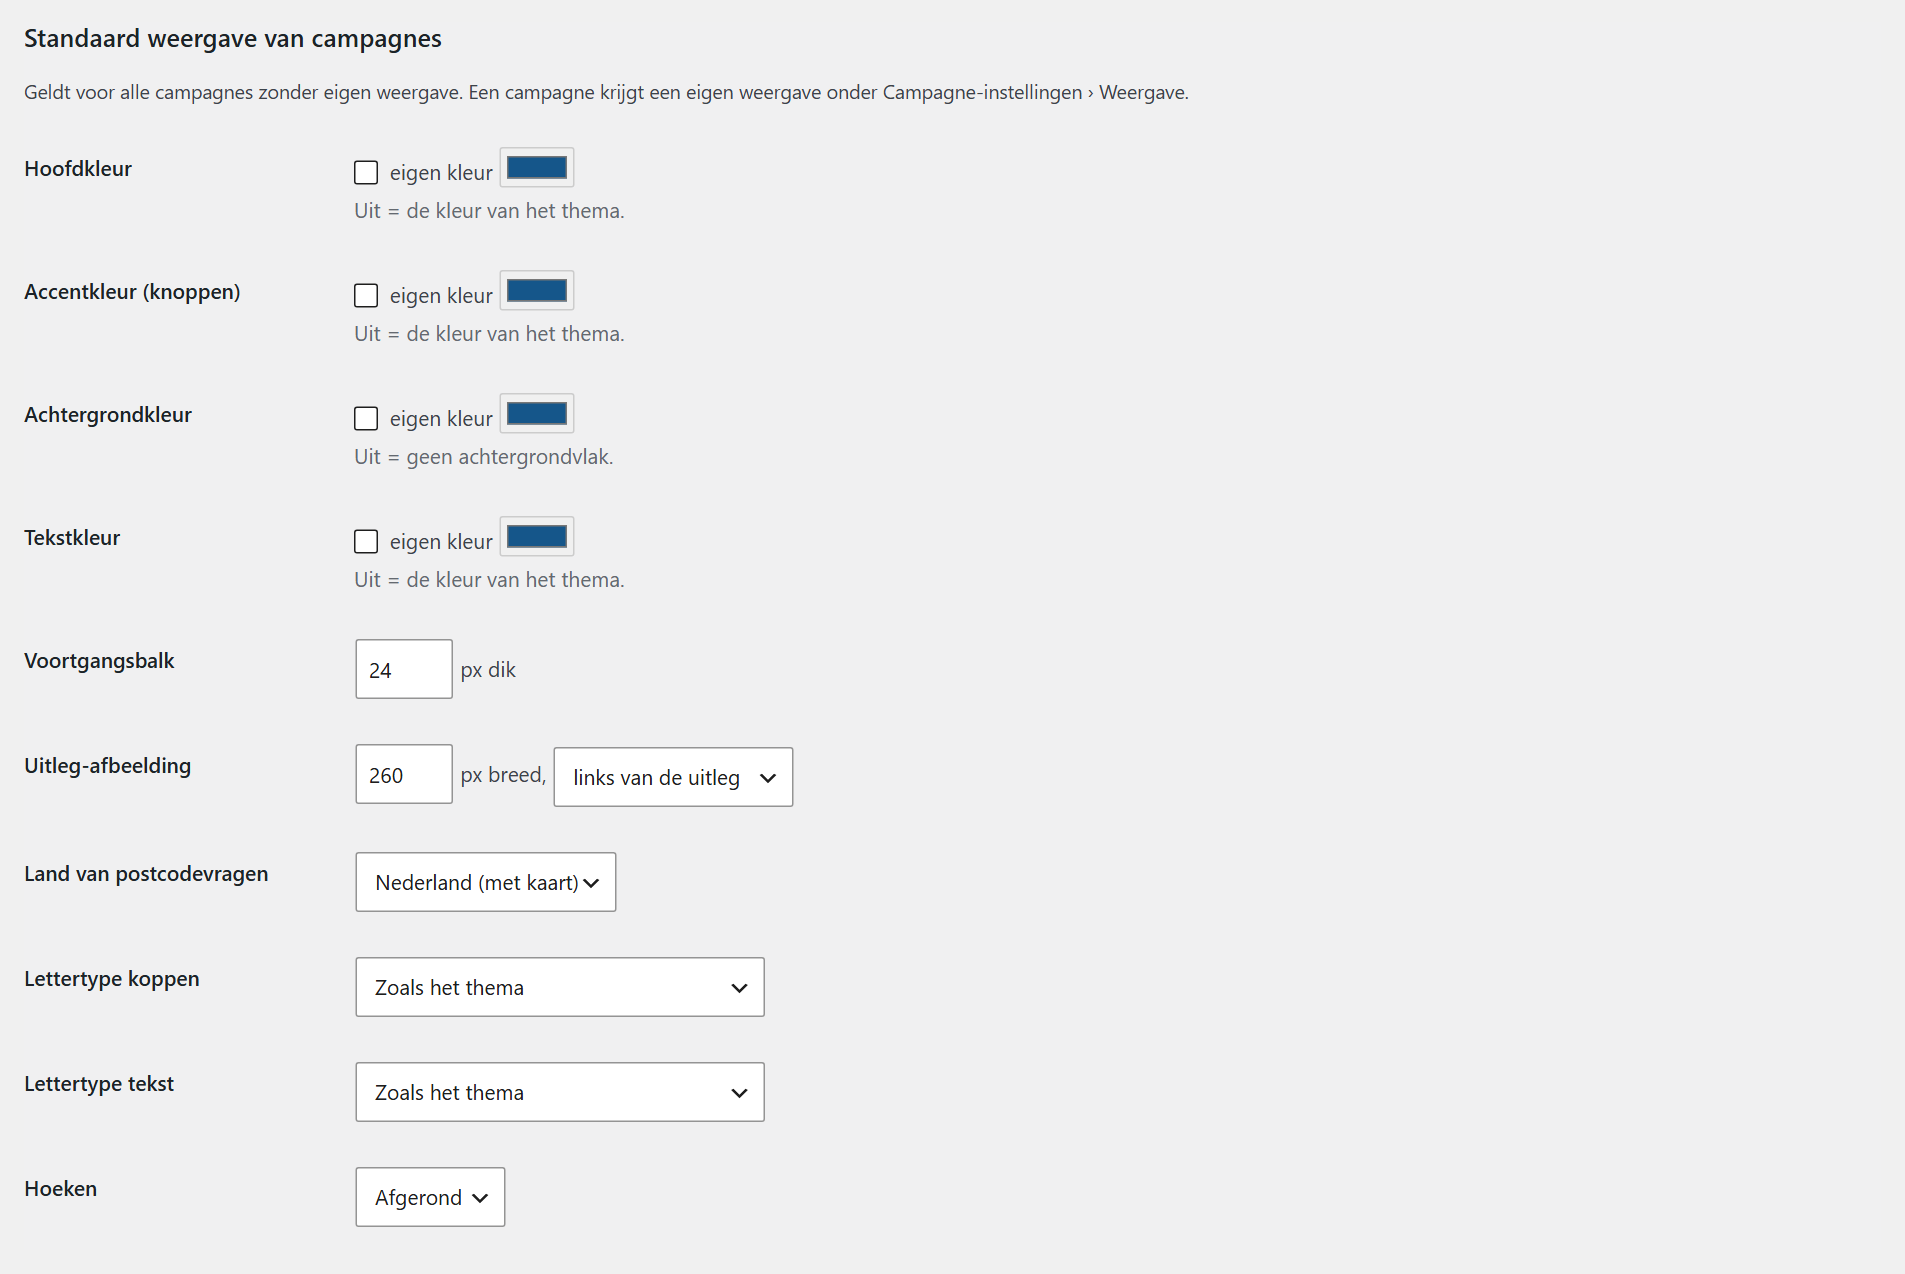
Should one campaign look different? In that campaign, switch on Eigen weergave (own look) under the campaign settings. When it is off, the campaign always follows the default look, also when you change it later.
Putting a test on your site
Every campaign has its own address (/test/<name>/), but usually you put the test on a regular page. The easiest way is a block.
With a block (recommended)
- Open or create a page and click + (add block).
- Search for Matchoice. The blocks have their own group “Matchoice”.
- Choose a block, for example Campagne (vragenlijst) (campaign / questionnaire).
- In the sidebar, choose the campaign from the Campagne dropdown. No typing needed.
- Save the page.
| Block | Shows |
|---|---|
| Campagne (vragenlijst) | The test, followed by the result |
| Uitkomsten (modellen / partijen) | Overview of a campaign’s outcomes, with picture and excerpt |
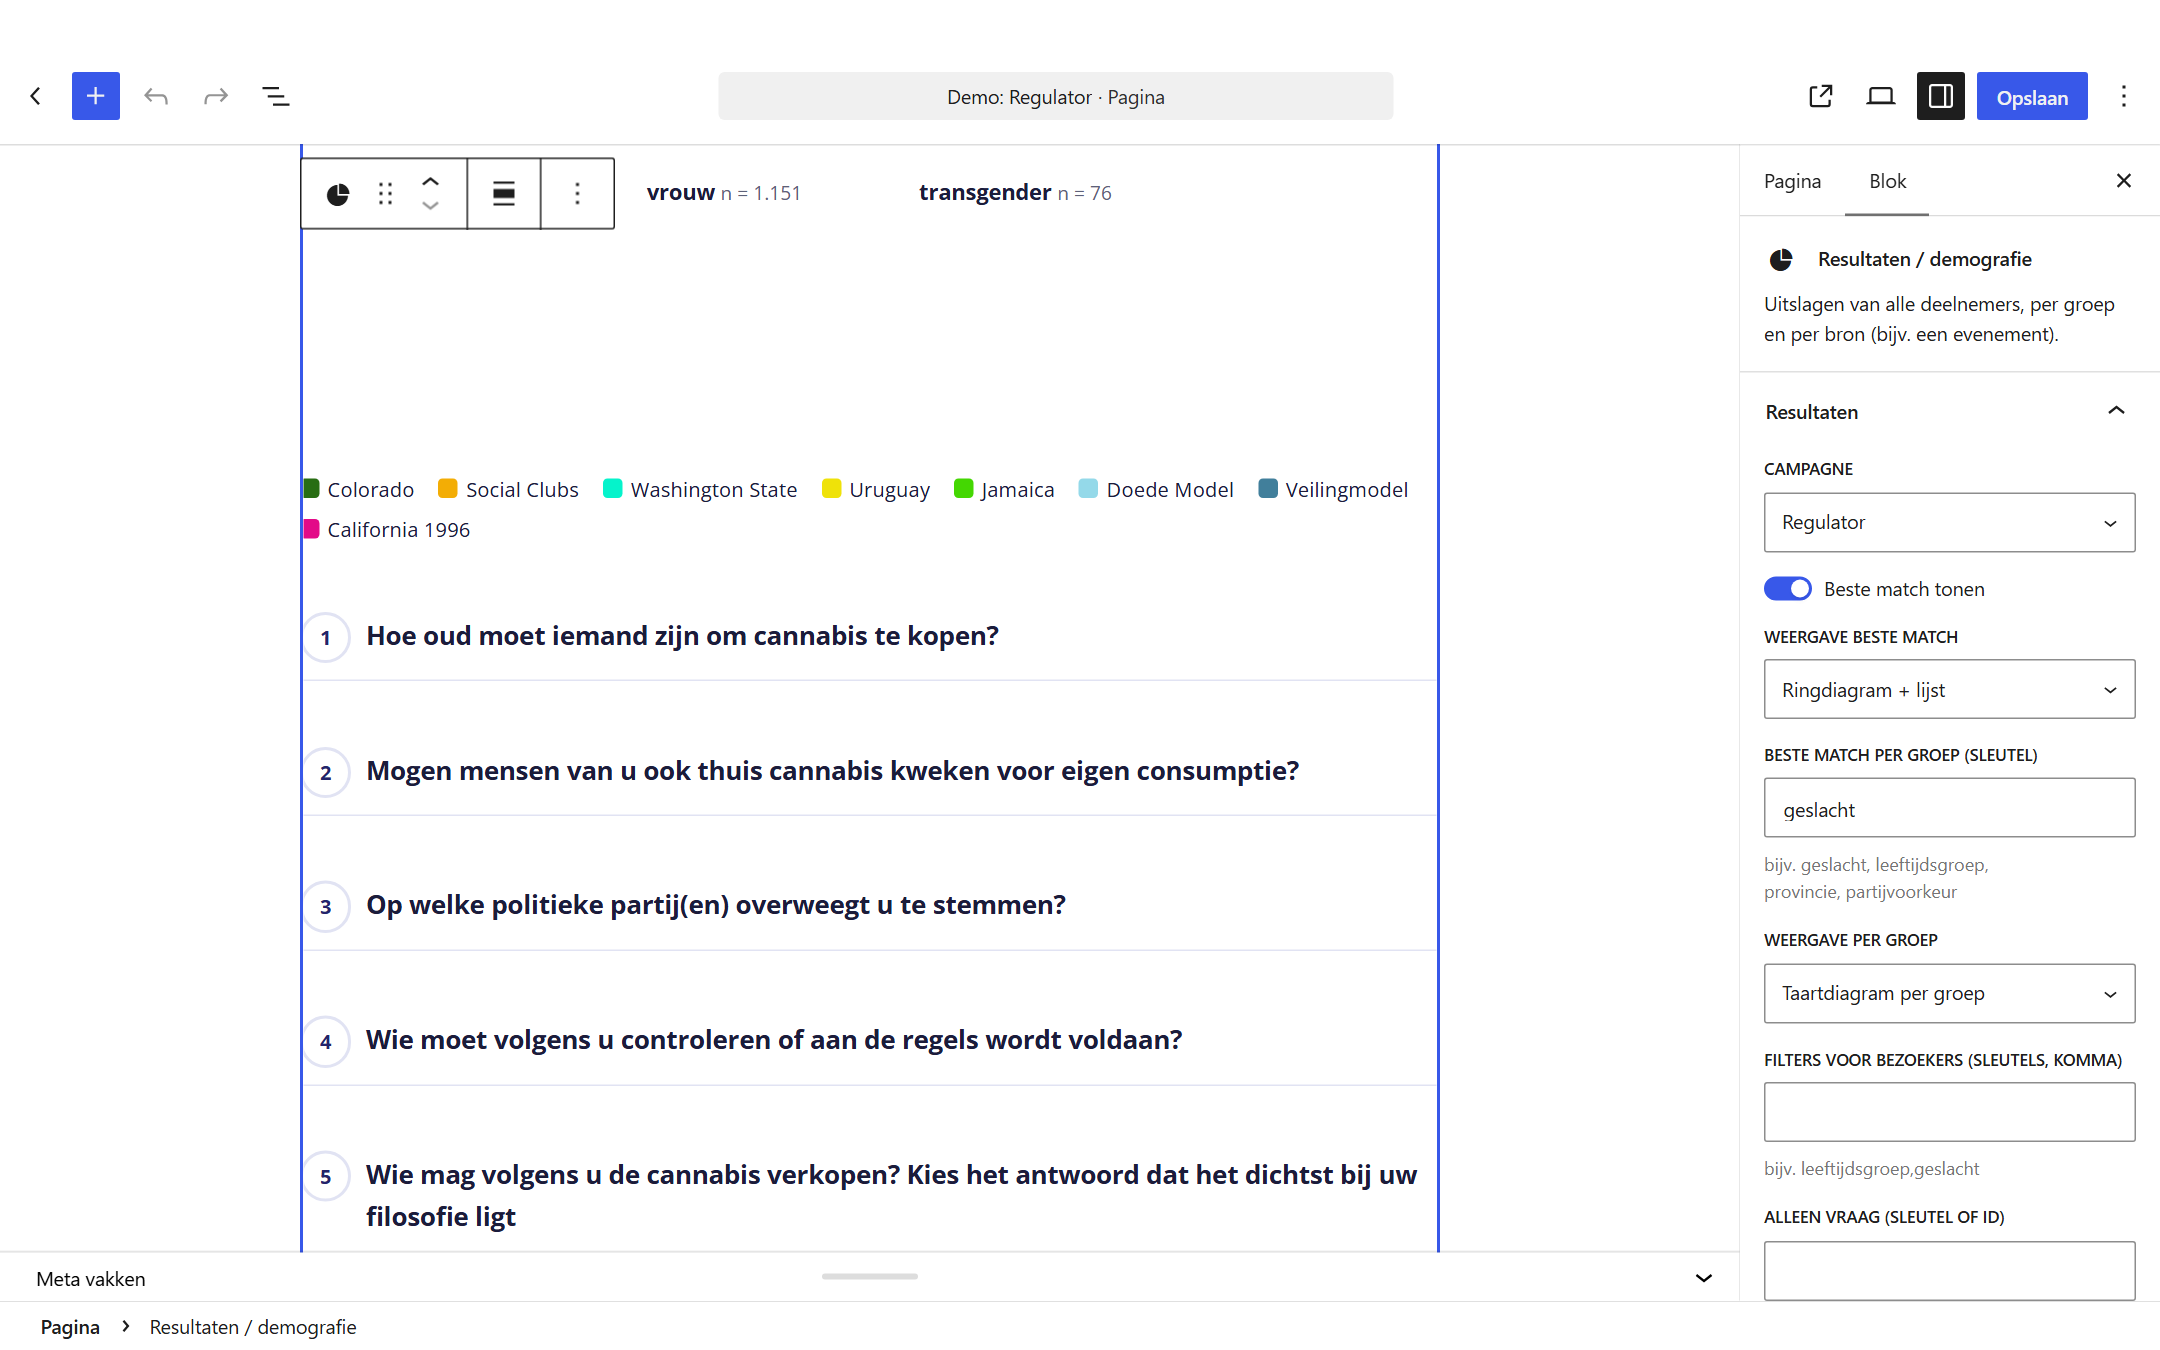
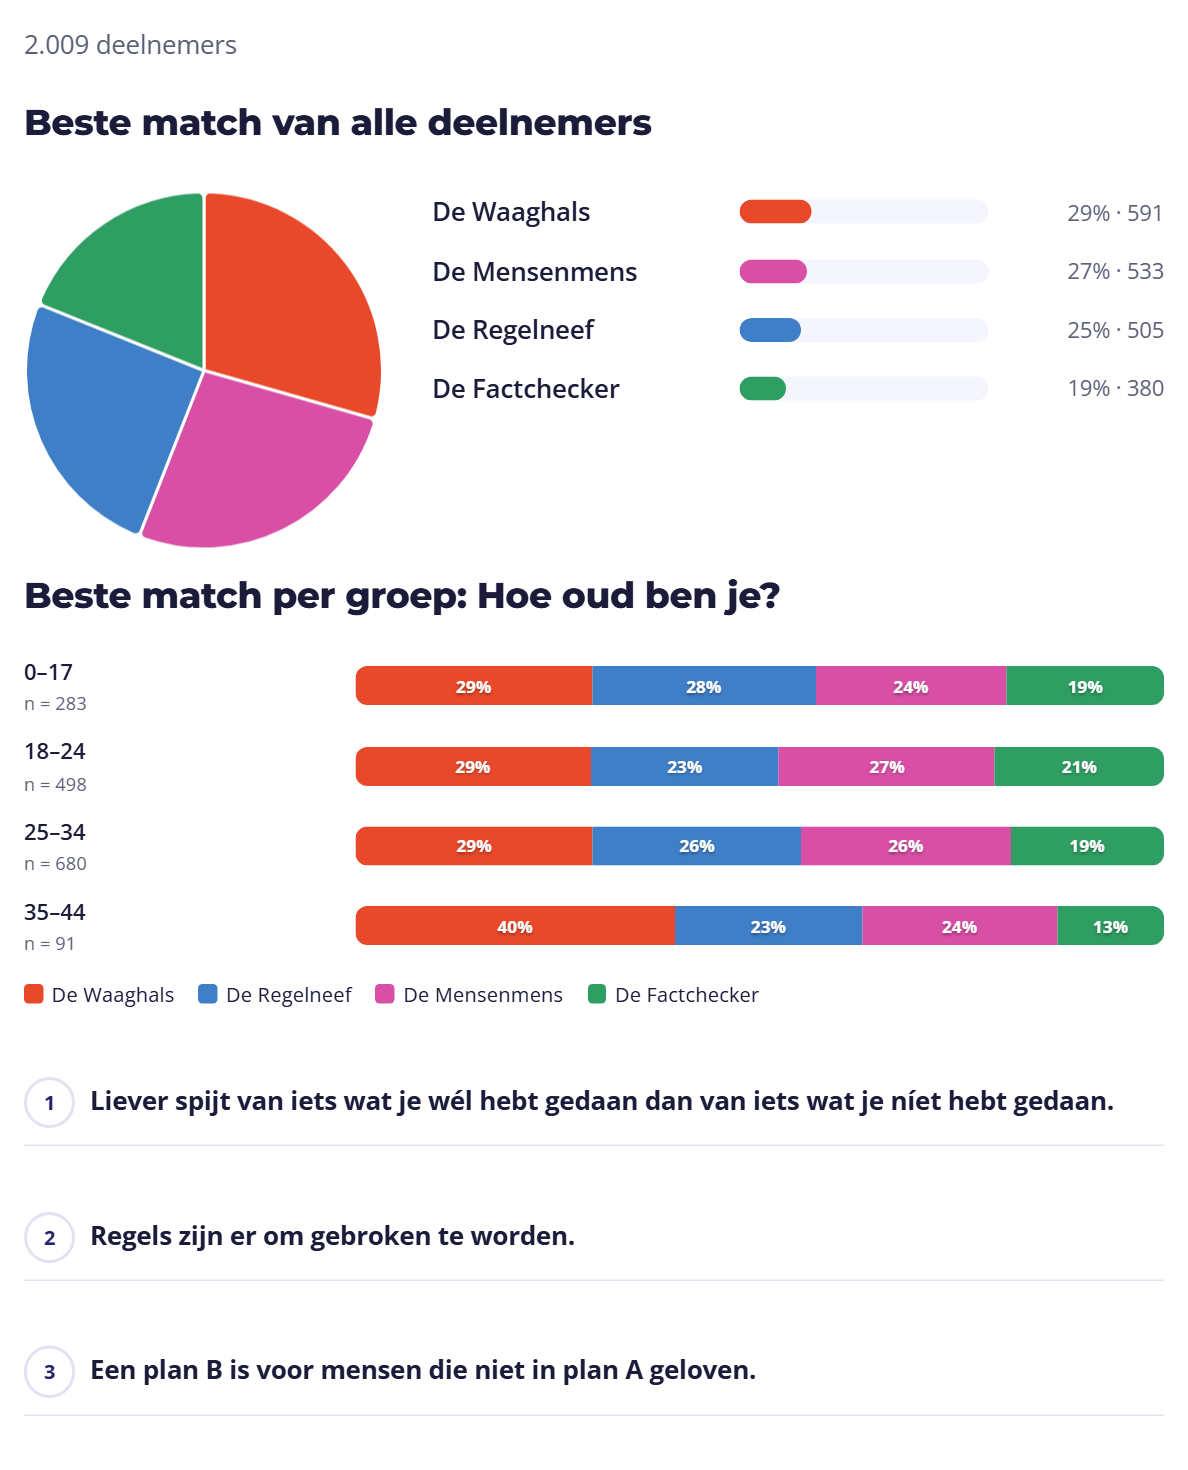
| Resultaten / demografie | Public results: charts, breakdown per group (for example age), map, filters for visitors |
| Taalkeuze | Switching between Dutch and English |
Options of the results block. Choose the chart (doughnut, pie, bars or none) and how the breakdown per group looks (table, stacked bars or pies). For best match per group and filters for visitors you enter the key of a question, such as leeftijd or postcode; the key is shown with every question in the question list. Groups smaller than five are never shown.
With a shortcode (classic themes and page builders)
Not using blocks? Use a shortcode. You do not have to write it yourself: under Campagnes (Campaigns), the column Op een pagina zetten (put on a page) has a ready-made shortcode for every campaign with a Kopiëren (copy) button. Paste it on your page.
The shortcode contains the short name of the campaign: the last part of the test’s address. If the test is at /test/welk-type-ben-jij/, the short name is welk-type-ben-jij. You can see and change it below the campaign title (“Permalink”). Instead of the short name you can also use the campaign’s number.
| Shortcode | Shows |
|---|---|
[matchoice campaign="welk-type-ben-jij"] | The test, followed by the result |
[matchoice_outcomes campaign="welk-type-ben-jij"] | Overview of the outcomes |
[matchoice_stats campaign="welk-type-ben-jij" by="leeftijd"] | Public results, with the best match per age group |
Main campaign. Under Campagnes › Instellingen (Campaigns › Settings) you choose the main campaign: it is shown when a block or shortcode does not name a campaign.
Results, analytics and export
Analytics
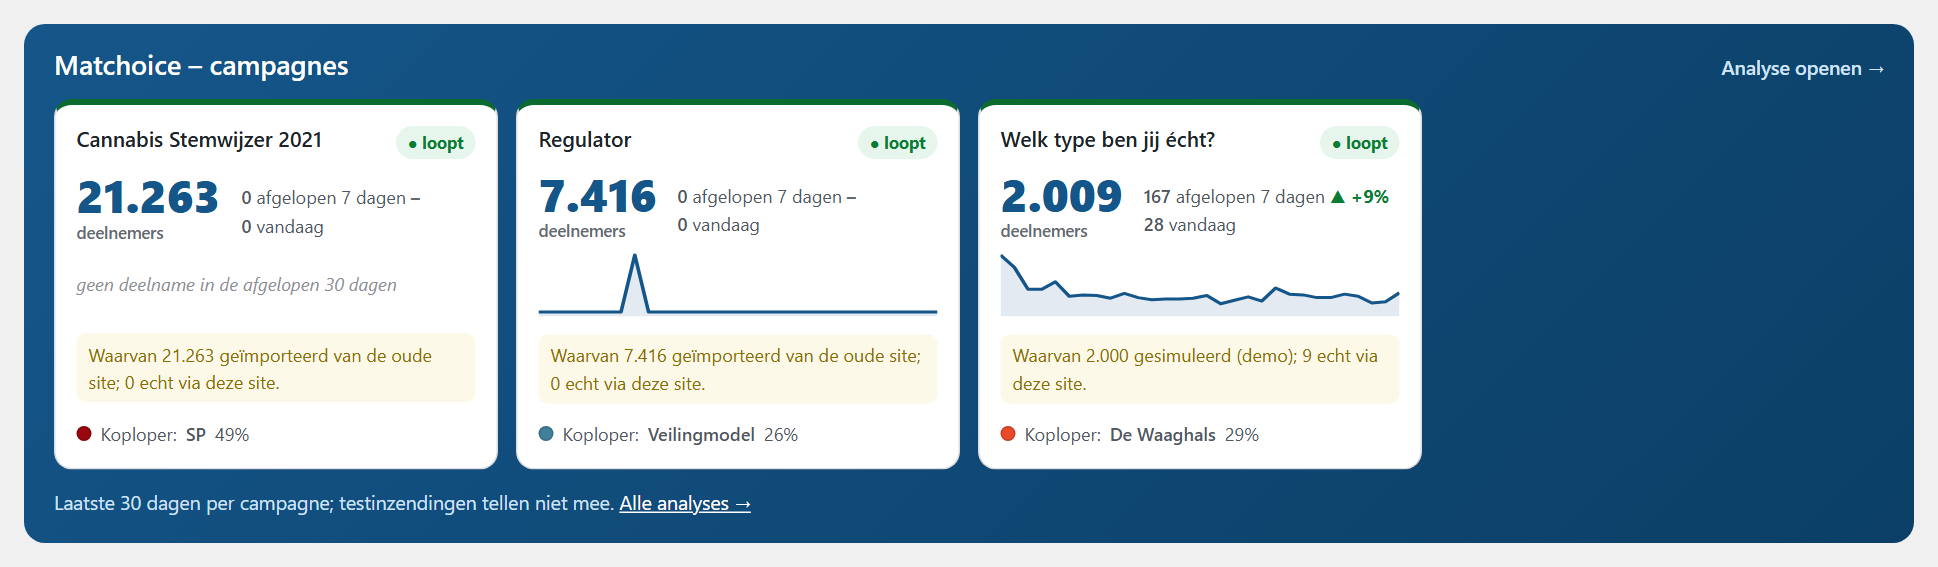
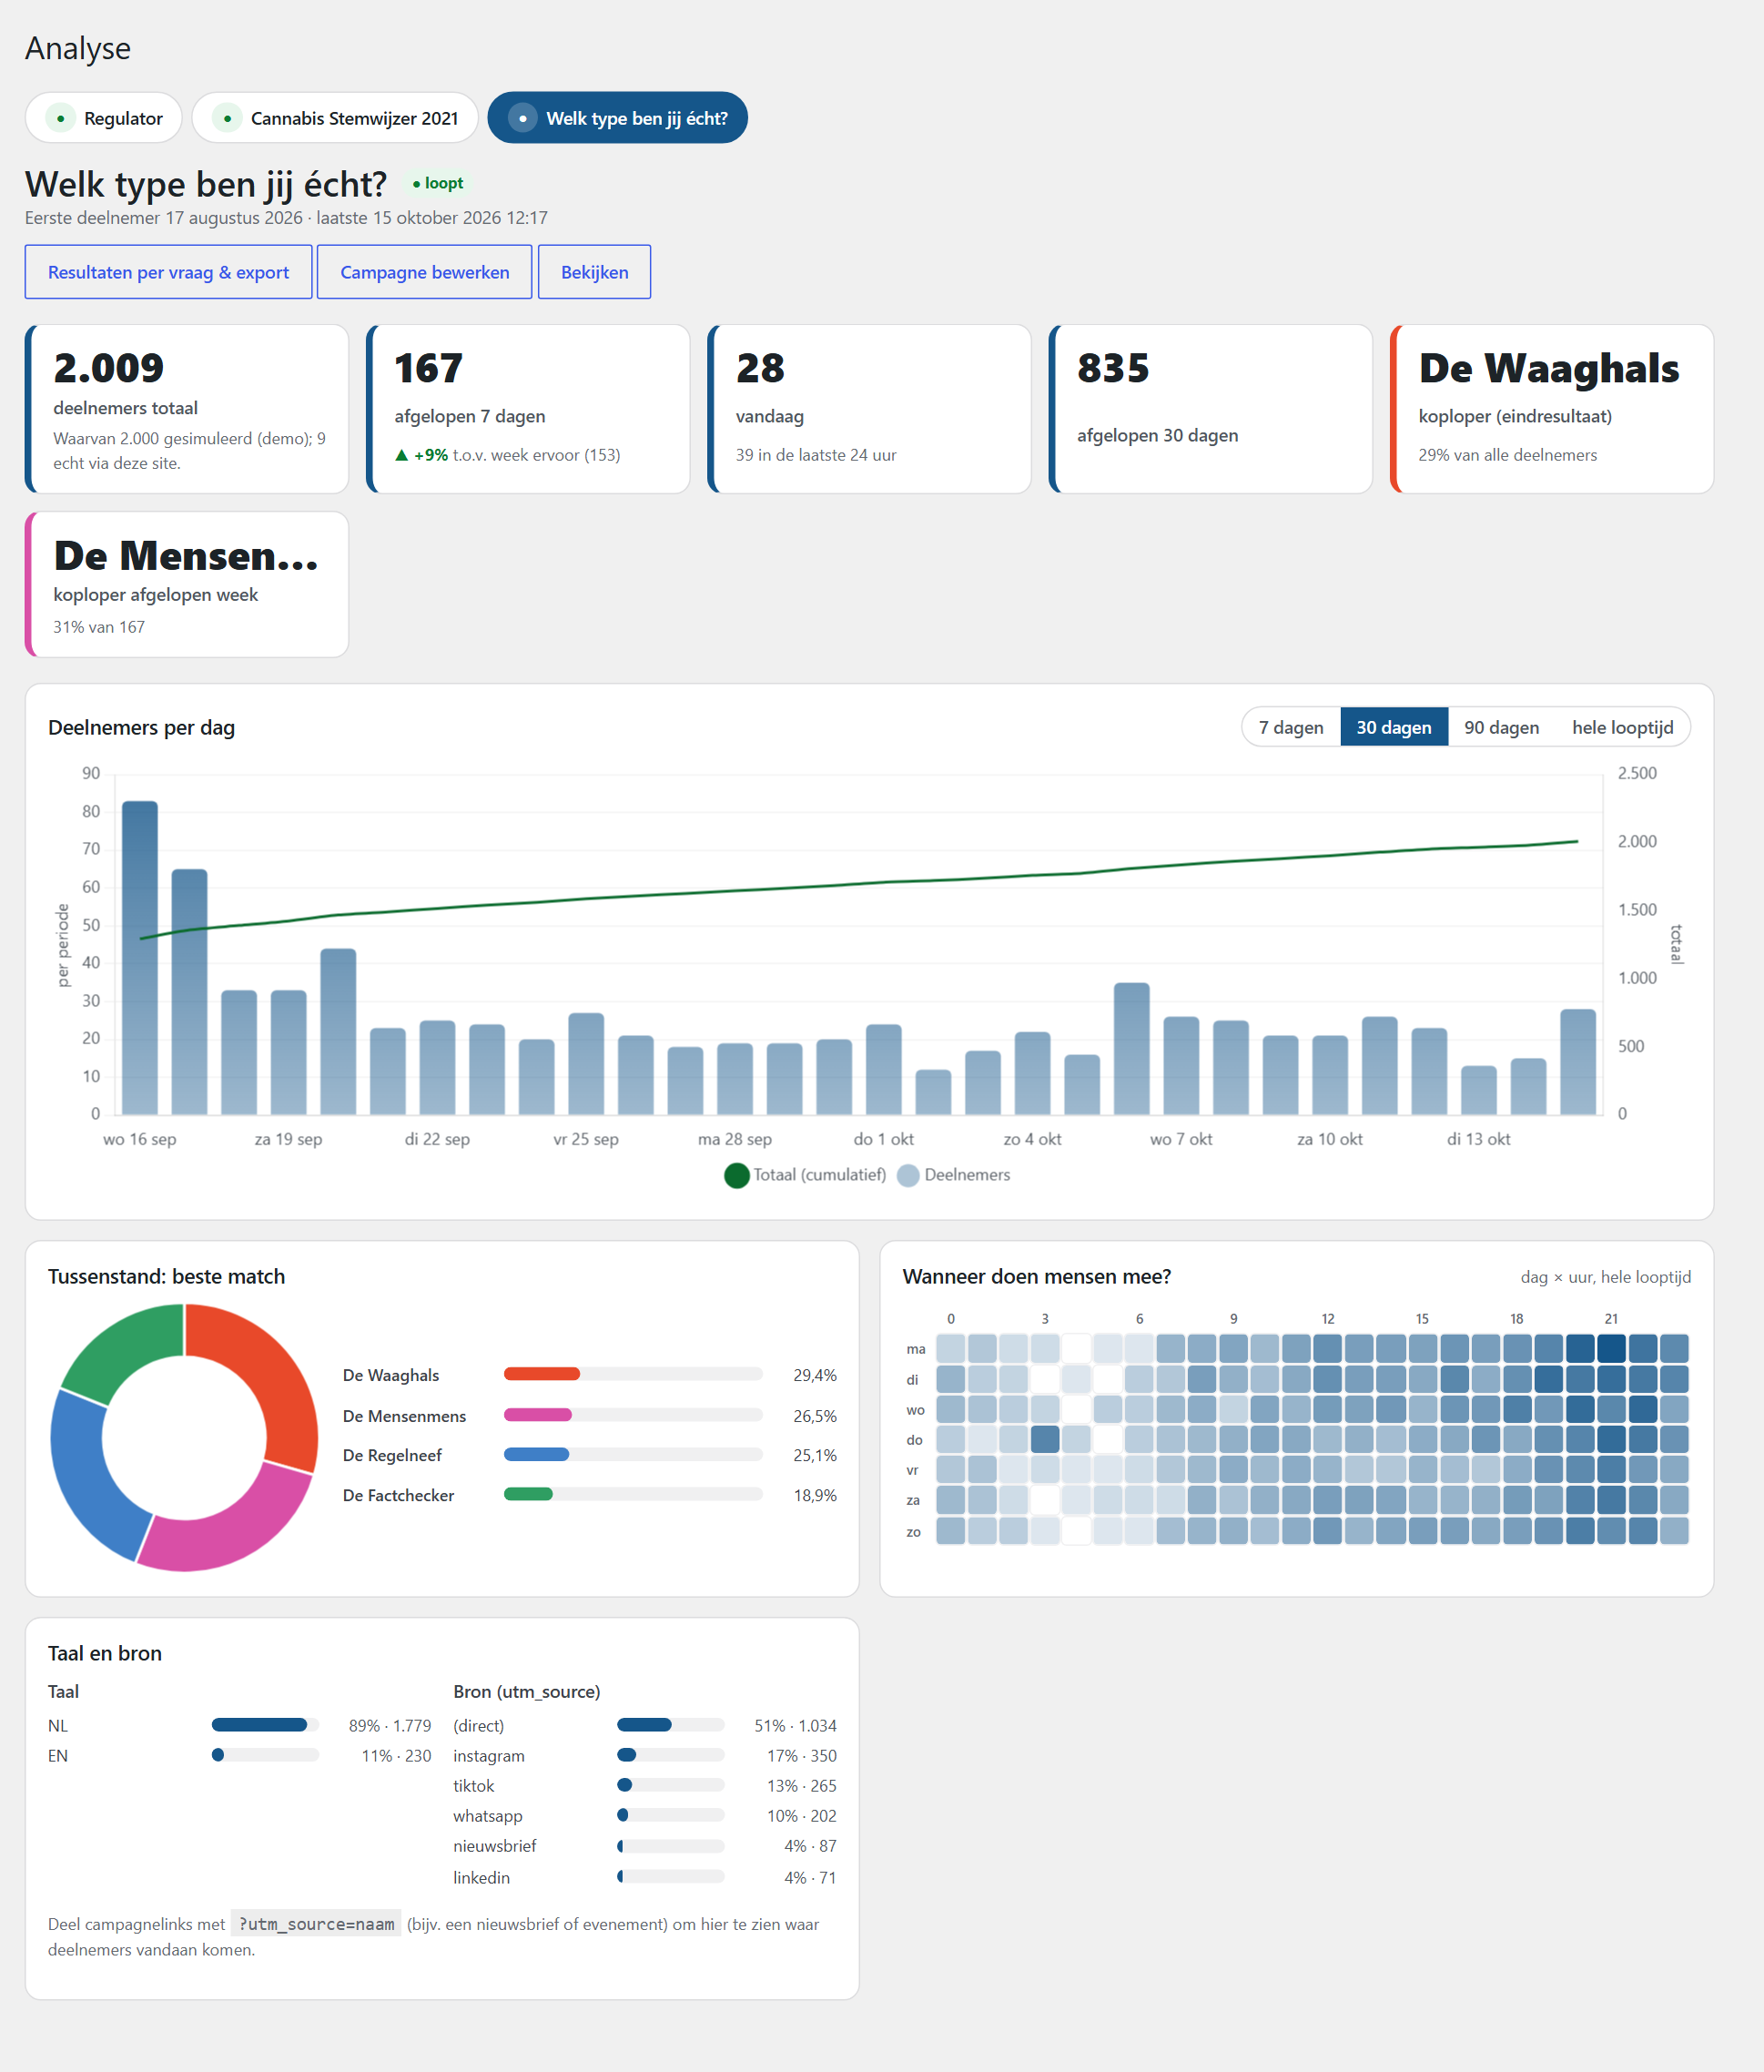
The WordPress dashboard shows a card per campaign with the number of participants, the last seven days, today and the current leader. Imported or simulated participants are mentioned separately. Campagnes › Analyse (Campaigns › Analytics) shows participants per day or week, the trend compared with the previous week, growth, weekday and hour, the final result, languages and sources.
Results per question
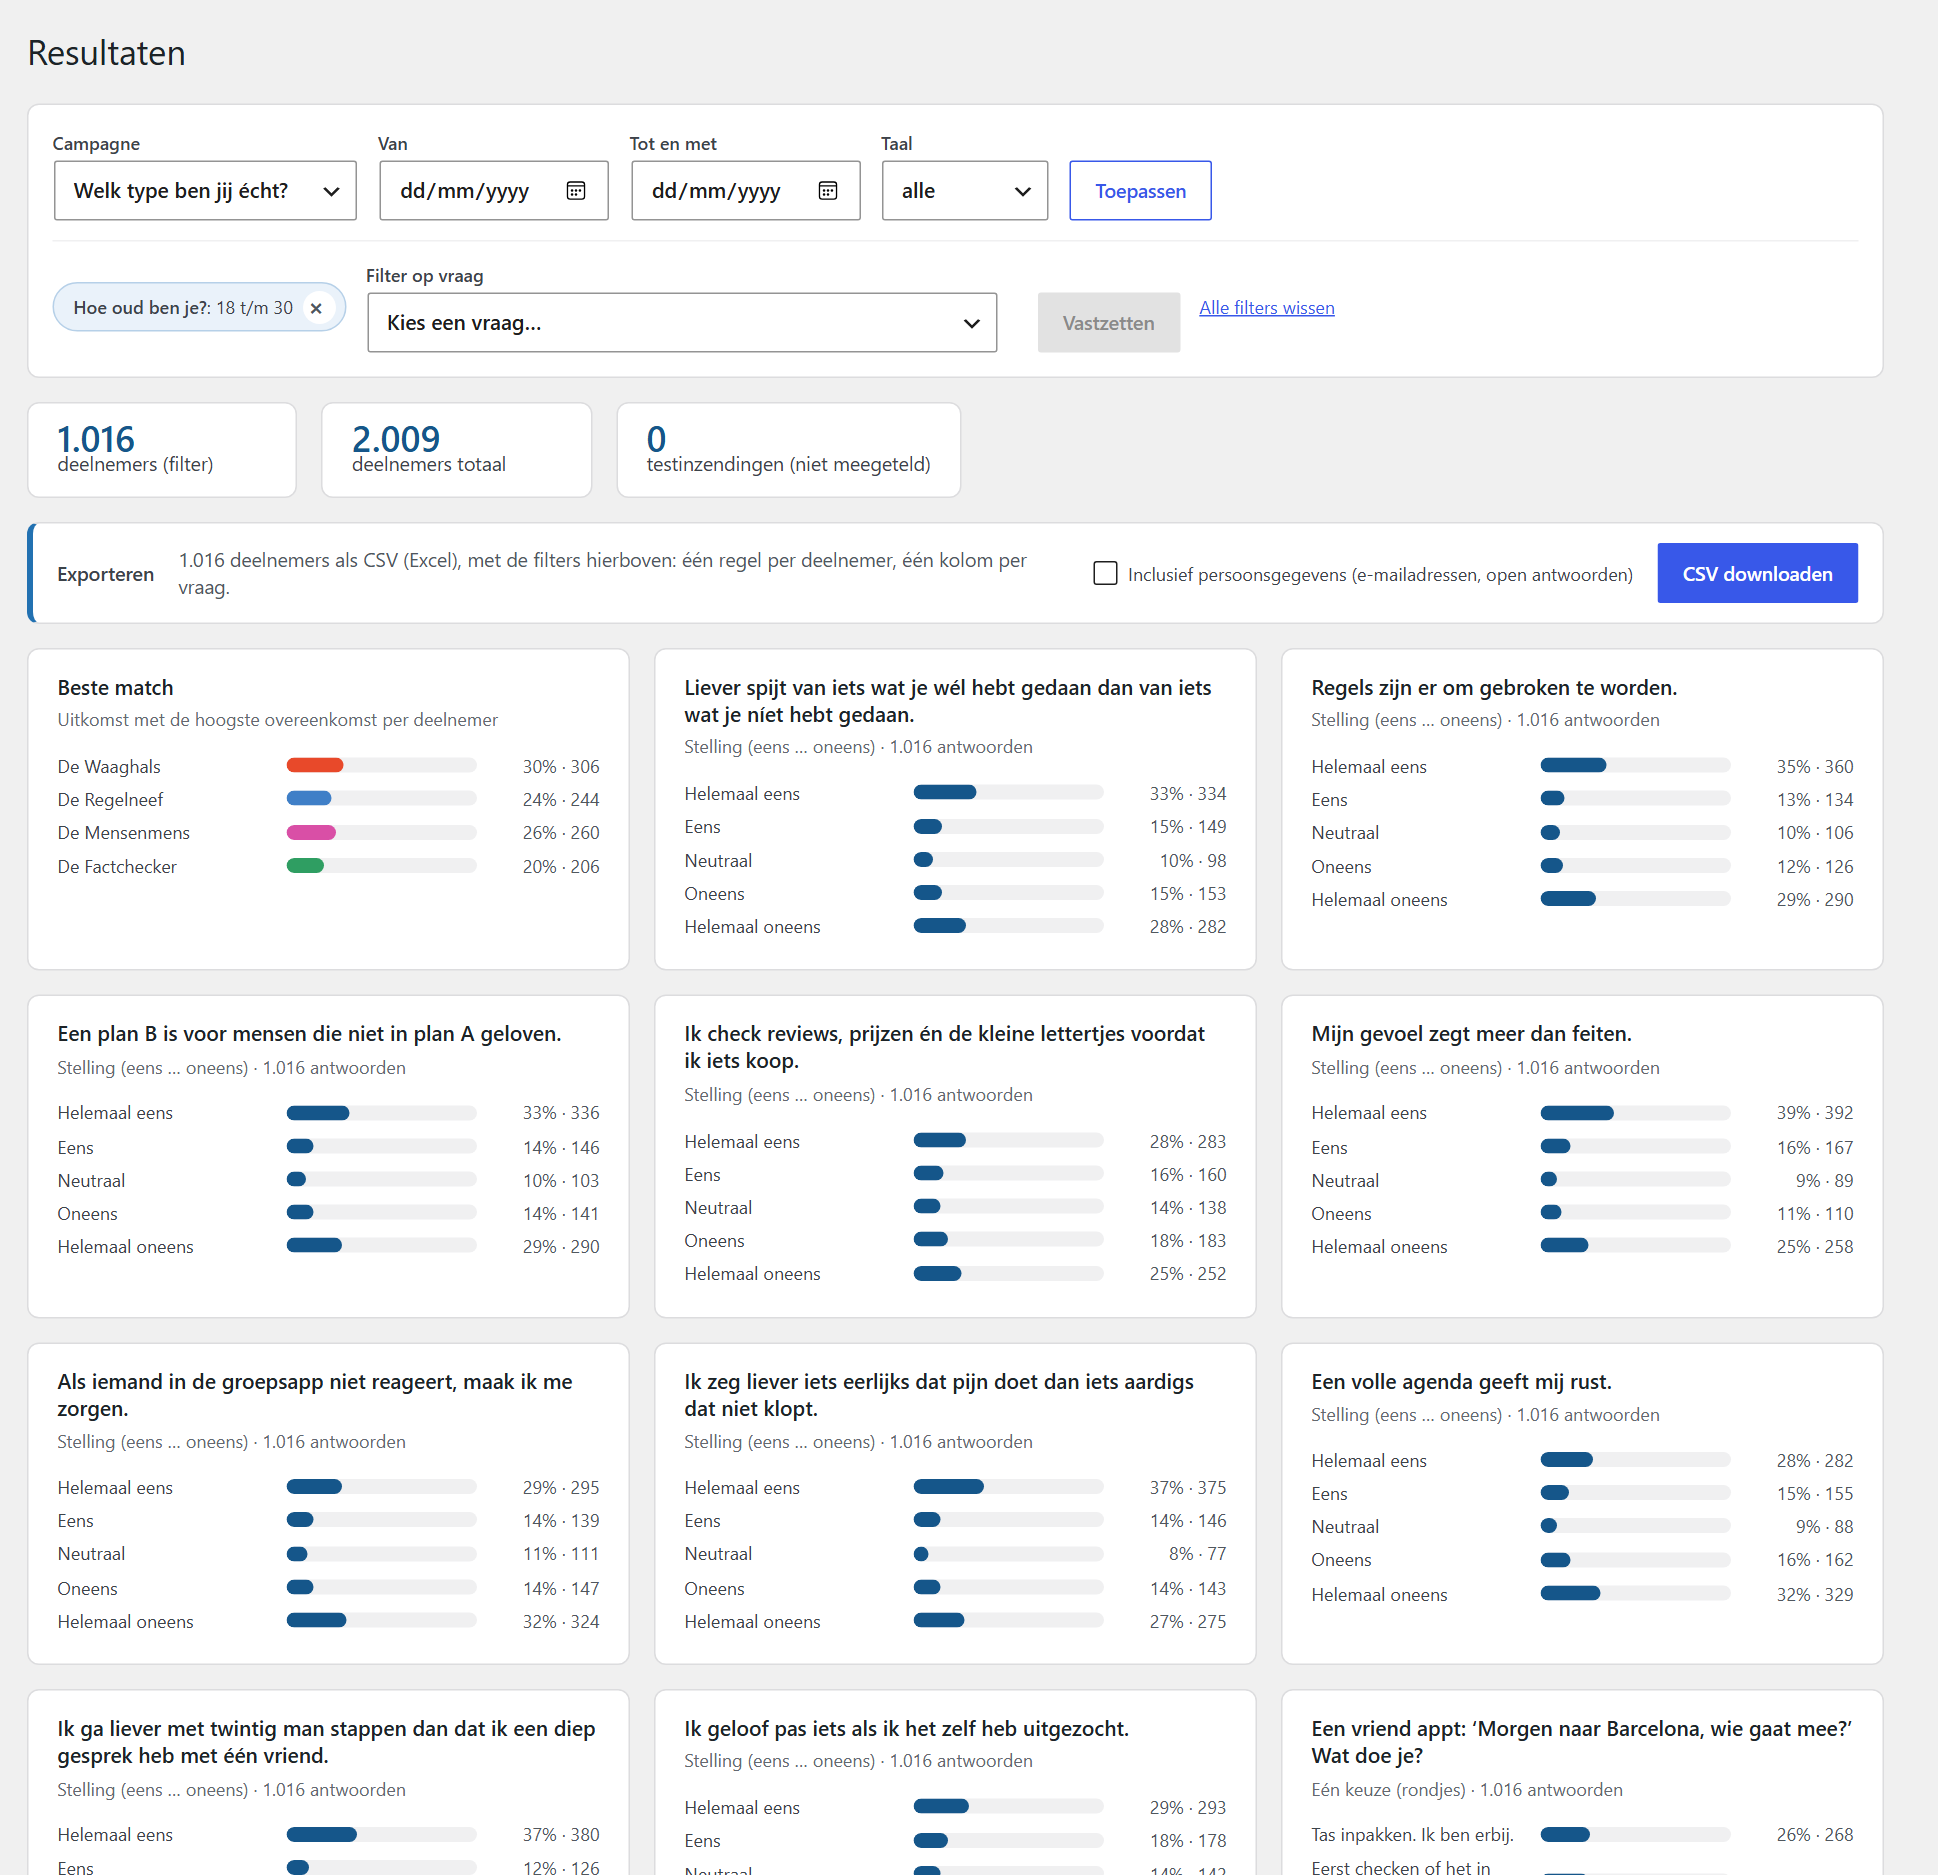
Campagnes › Resultaten (Campaigns › Results) shows the best match per outcome and the distribution of answers for every question.
- At the top you choose the campaign, the period and the language.
- Under Filter op vraag (filter on question) you choose one question, then the answer, a range (for age or number) or the start of a postcode, and click Vastzetten (pin). The filter appears as a label; combine up to five. Remove a filter with ×.
- All figures on the page follow the filters.
Export
Right below the figures is CSV downloaden (download CSV). You get one row per participant and one column per question, with the filters that are active. The file opens in Excel. E-mail addresses and open answers are only included when you tick Inclusief persoonsgegevens (including personal data); only administrators can, and it is logged.
Test submissions
Submissions by logged-in administrators and on unpublished campaigns count as tests. They are left out of every figure; remove them with Testinzendingen verwijderen (delete test submissions).
Languages
Every text in Matchoice has a Dutch and an English version: questions, answers, explanations, outcomes and the texts with the result. Switch with the language button in the editor. Visitors get the language of the page; ?taal=en forces English. With Polylang, Matchoice follows Polylang’s language, and on test and outcome pages the menus and footer follow the language of the test.
Bot protection and privacy
Bot protection
A test that gets attention also attracts bots. Matchoice protects every form with a hidden field, a signed timing check and a limit per visitor. For extra protection, set up one of these services under Campagnes › Instellingen › Botcontrole (Campaigns › Settings › Bot check):
- Cloudflare Turnstile (recommended): free, no puzzles and no tracking cookies. Create a widget at dash.cloudflare.com and enter the site key and secret key.
- Google reCAPTCHA v3: invisible, with a score per visitor. Create a v3 key at google.com/recaptcha/admin, add your domain and enter both keys. Submissions scoring below the threshold (default 0.5) are refused. Note: reCAPTCHA loads scripts from Google; mention this in your privacy policy.
The secret key is never shown again after saving. Keys in wp-config.php (MATCHOICE_TURNSTILE_SITE and MATCHOICE_TURNSTILE_SECRET, or MATCHOICE_RECAPTCHA_SITE, MATCHOICE_RECAPTCHA_SECRET and MATCHOICE_RECAPTCHA_MIN) take precedence.
Privacy
- No IP address, session or browser data is stored with an answer.
- Postcodes are stored as digits only; per question you choose whether only the first two digits are kept.
- The rate limit uses a short-lived keyed hash of the IP address that expires by itself.
- Public statistics never show groups smaller than five.
- Matchoice sets no tracking cookies.
Installation report
After installation Matchoice asks once whether it may report that it runs on your site. If you agree, Matchoice reports to Digizaal on activation, weekly and on deactivation: the site address and name, the versions of Matchoice, WordPress and PHP, the language and the number of campaigns. This tells Digizaal which versions are in use and lets it warn you about important updates. Visitors, answers, users or e-mail addresses are never sent. Under Campagnes › Instellingen › Installatiemelding (Campaigns › Settings › Installation report) you see exactly what is sent and can switch it on or off.
Matchoice Pro always reports while it is active; this is part of the licence (see the terms).
Roles and capabilities
Matchoice adds the role Campagnebeheerder (campaign manager): someone who manages campaigns, outcomes and results without being an administrator of the whole site. Administrators can also set up the bot check and export personal data.
Matchoice Pro: inviting parties
With Matchoice Pro, outcomes such as political parties enter their own positions. Install Pro after the free plugin via Plugins › Add New › Upload Plugin. After purchase you download the zip from the confirmation e-mail or under My account › Downloads.
How it works
- Prepare the statements. Create the campaign with statements and tick the outcomes (parties). Every statement has the checkbox Uitnodiging (invitation): on means parties answer this statement. Switch it off for demographic questions such as age.
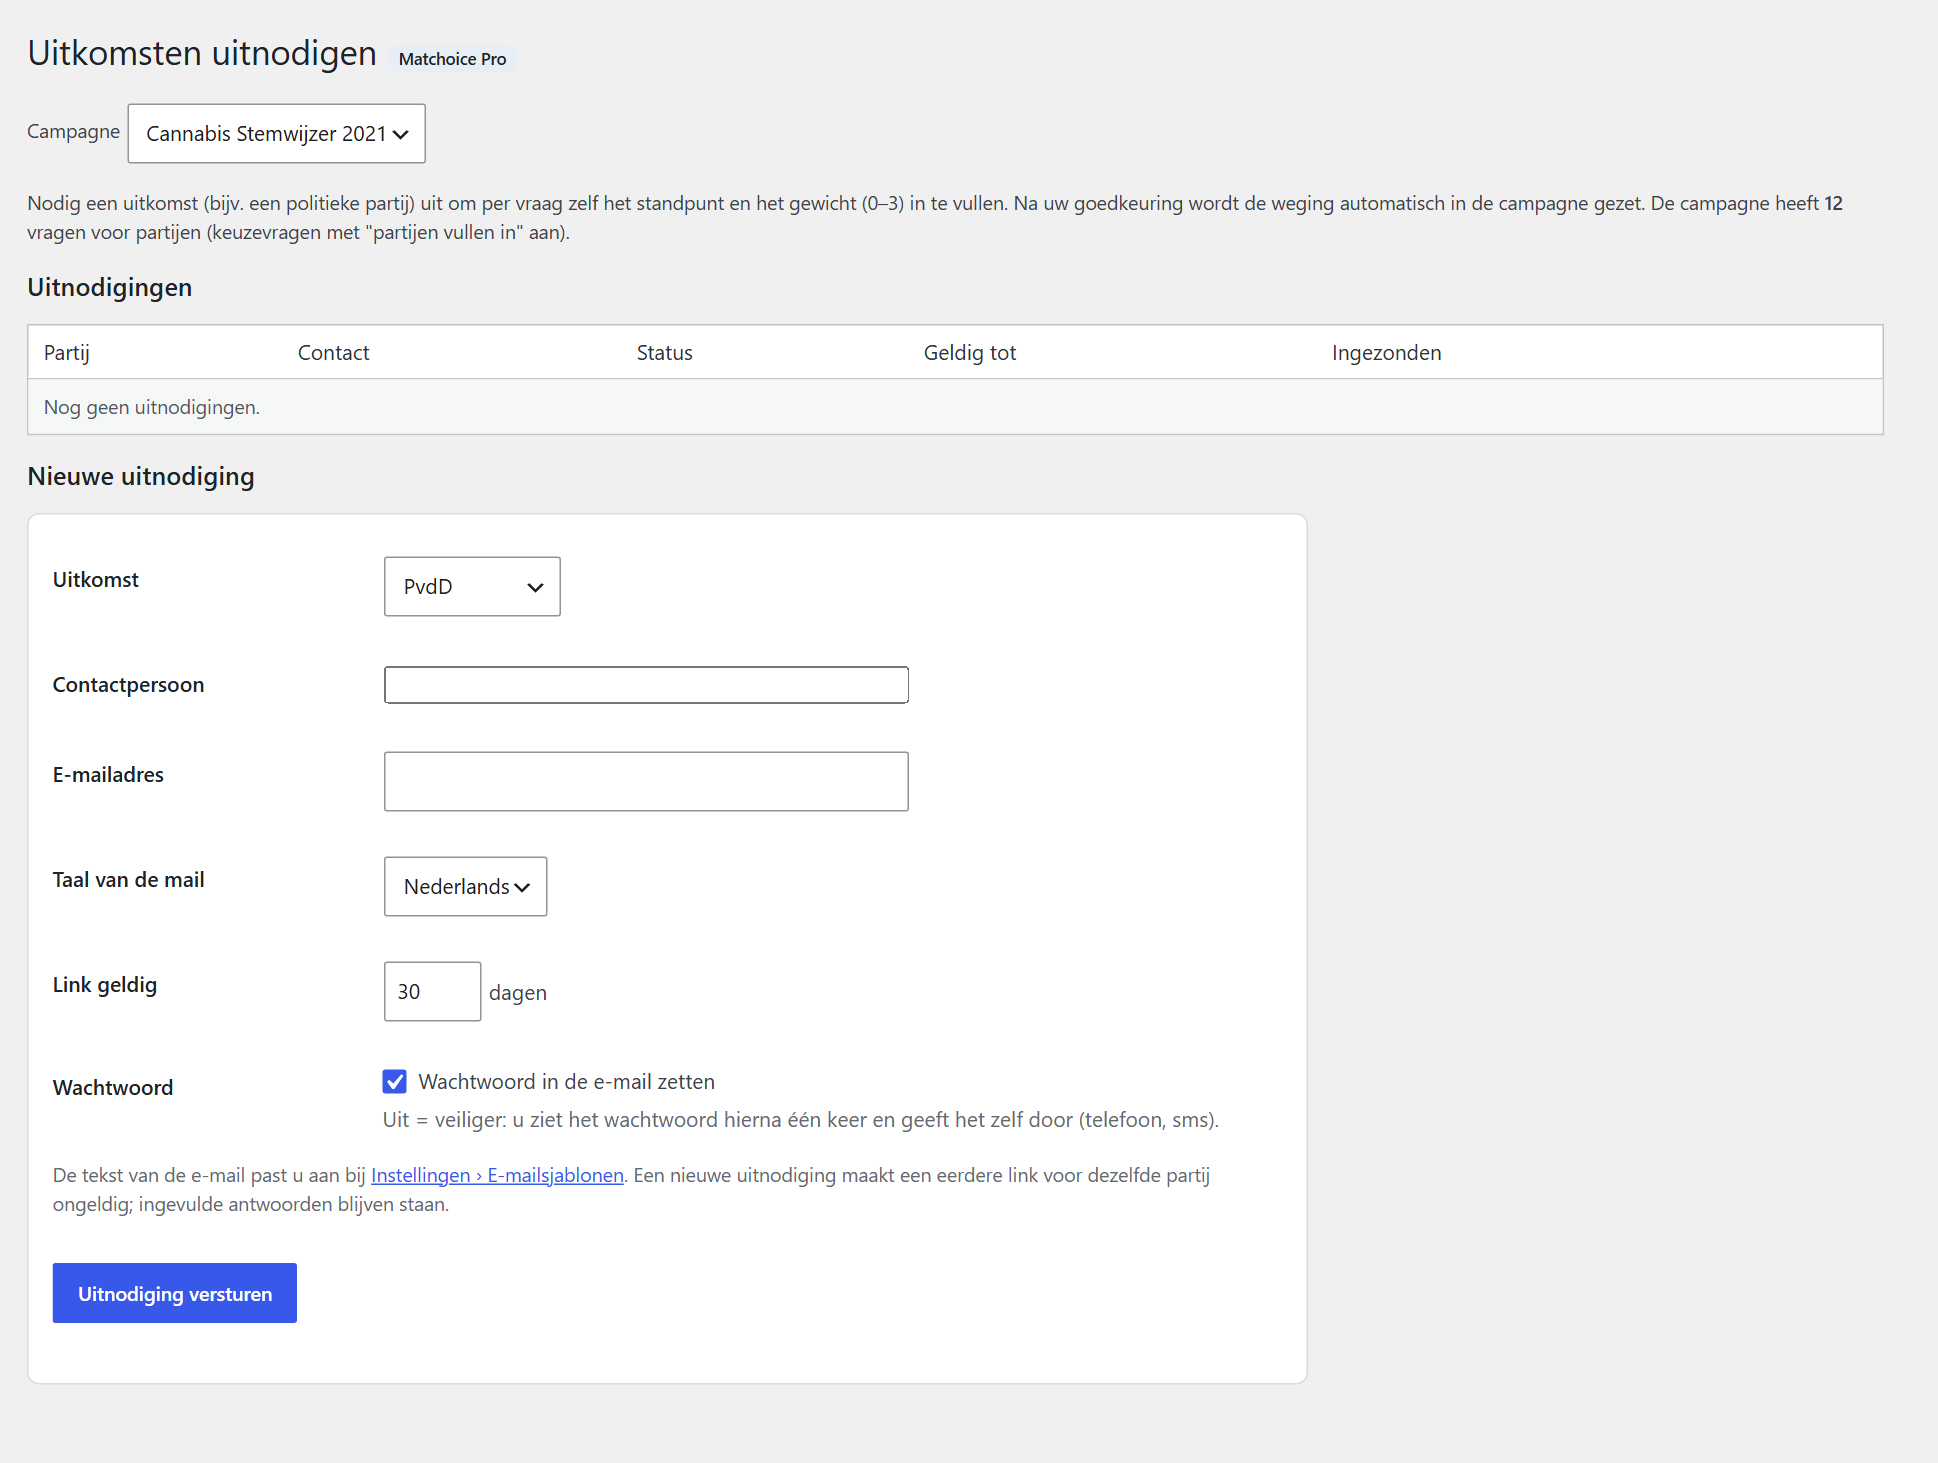
- Invite. Go to Campagnes › Uitnodigingen (Campaigns › Invitations) and choose the campaign. Under Nieuwe uitnodiging (new invitation) enter the outcome, contact person, e-mail address, language of the e-mail and number of days the link is valid. Click Uitnodiging versturen (send invitation).
- Password. By default the password is in the e-mail. Safer is to switch that off: you see the password once and pass it on yourself, for example by phone.
- The party fills in. In the portal, the party gives its position per statement (or “no position”), a weight (normal, important or very important) and an explanation, and edits its own profile text. It can save a draft and submit when done.
- Review. Click Beoordelen (review) at the invitation. Choose Goedkeuren en scores toepassen (approve and apply scores) to put the weighting in the test, or Terugsturen ter aanpassing (send back for changes) with a note. The party then receives an e-mail with your note.
- Make final. Click Definitief maken (live) (make final (live)) when the campaign goes live. After that nobody can change that outcome’s positions and weighting, the editors included. An invited outcome only appears in the test after approval.
Need to cancel a link, for example because the contact person left? Click Intrekken (revoke) and create a new invitation.
E-mail templates
Under Campagnes › Instellingen › E-mailsjablonen (Campaigns › Settings › E-mail templates) you edit the invitation and the send-back e-mail, in Dutch and English, with the normal WordPress editor. An empty field uses the default text. Available fields: {partij} (party), {contact}, {campagne} (campaign), {link}, {wachtwoord} (password), {deadline}, {opmerking} (note), {afzender} (sender), {organisatie} (organisation), {siteurl} and {site}.
Logbook and security
For every invitation you see what happened: created, e-mailed, opened, logged in, wrong passwords, saved, submitted, reviewed and made final. Links and passwords are stored as hashes only. Links expire and five wrong passwords lock the invitation.
WP-CLI
wp matchoice demo personality                 # install the example test
wp matchoice recalc <campaign>                # recalculate results after a new weighting
wp matchoice stats <campaign>                 # totals per outcome
wp matchoice simulate <campaign> --count=500  # simulated participants for a demo
wp matchoice simulate <campaign> --delete     # remove them again
wp matchoice import <folder> --source=…       # import an old wotan voting guide
wp matchoice-pro invites <campaign>           # invitations and their status (Pro)
Frequently asked questions
My own test does not count.
Right: as a logged-in administrator your submission counts as a test. Log out or use a private window to take part as a visitor.
My colours do not show.
Check whether the campaign has its own look (Eigen weergave (own look)). Then it does not follow the default look. The default look settings list the campaigns with their own look.
Can I change questions while the test is running?
Yes. Texts can always be changed: answers stay linked to the question, also when you change its wording. To remove a question, switch it offline.
Where are the answers stored?
In your own WordPress database, in the tables matchoice_responses and matchoice_answers. Nothing is sent to Digizaal or anyone else.
Need help?
Digizaal can set up Matchoice for you. Send a message via contact.